By Polly Giantonio
At OneWorld Memorials, we are often asked how to fill a jewelry urn with a loved one's ashes. The process is simple, but quite different than that of filling a large display cremation urn - both mechanically as well as spiritually. While putting ashes in a necklace or cremation jewelry is straightforward, the jewelry itself can be a difficult reminder at times. Not only is a piece of cremation jewelry small but wearing it close to one's heart infers intimacy and comfort. We want to honor the personal nature of wearing cremation jewelry by providing you with details on how to handle the cremation ashes and how to put ashes in an urn necklace or jewelry urn.
What Types of Cremation Jewelry Are There?
Cremation jewelry comes in many forms, the most common being a necklace to hold ashes through a special compartment in the pendant. Jewelry made from ashes is also common, but these types of jewelry are made beforehand and do not need any special directions for use. Putting ashes into jewelry, however, may require a bit more diligence and attention due to the small size of the openings and the importance of the ashes themselves. Whether you've purchased a bracelet, pendant or necklace for ashes, OneWorld Memorials is here to show you the best methods for putting ashes into jewelry and how to put ashes in an urn necklace.
Keep in mind that if you're uncomfortable with filling a jewelry urn with ashes, you may request that your service provider (either the crematorium or the funeral home) do this for you. Note the Federal Trade Commission's Funeral Rule that specifies: "The funeral provider cannot refuse to handle a casket or urn you bought online, at a local casket store, or somewhere else - or charge you a fee to do it."
Our instructional video and its contents:
- Before you fill cremation jewelry
- Materials you will need to fill your jewelry urn
- Steps on how to fill a jewelry urn and seal the urn
Care for your cremation jewelry is specific to the metal.
Before You Fill Cremation Jewelry
Determine how your jewelry is loaded. Each piece uses one of three designs:
- top-loaded jewelry urn with a twist-off cap
- bottom-loaded jewelry urn closed by a small screw
- back-loaded jewelry urn closed by a small screw
Our step-by-step video focuses on jewelry urns that secure the ashes compartment with a small screw. Before you begin, decide whether or not you want the jewelry urn permanently sealed.
Identify an area in your home that:
- has a flat, level surface
- is well ventilated
- an area without wind
- an area with good lighting
Materials You Will Need to Fill Your Jewelry Urn
Gather and arrange the suggested items listed below.
- a thin towel
- small sheet of clean paper
- a toothpick*
- a small funnel* to fit the compartment urn
- a small sieve (optional - to sift clumps from fine ashes)
- liquid adhesive or glue (check with your vendor - OneWorld Memorials includes glue with each piece)
- a small flat-head screwdriver*
- a small plastic spoon
- a clothespin (to aid in propping up bottom or side-loaded cremation pendants)
* these items are included with OneWorld Memorials Cremation Jewelry orders. The funnel we include doubles as a spoon.
Expect that the cremated remains will come from the funeral home or crematorium in a thick polyethylene bag inside a sturdy cardboard or plastic box. Our article, "What To Expect When You Receive Cremation Ashes," provides sensitive information on receiving the call that the ashes are ready to bring home. This article walks you through what to expect when you pick up the ashes, how to handle the emotions that may come and steps that you can take to ease into the process. The box holding your lost loved one's remains will be labeled for proper identification and accompanied by a certificate of cremation.
Consider removing a small amount of ashes from the bag and placing them in a smaller container for ease of use. An urn with a small opening, such as a piece of cremation jewelry, requires special handling to fill and secure the ashes.
It is helpful to remember that cremation ashes can vary from a fine powder like sugar to a gravelly texture, similar to grains of sand or kitty litter.
Follow These Easy Steps to Fill Your Jewelry Urn
For additional assistance, refer to our video that provides visual prompts that could help clarify any of the steps below. Keep in mind the steps below are based on a screw cap rather than the twist-off cap.
- Place the thin towel on an ample workspace. This ensures that all urn parts are visible and close at hand. The towel also helps to secure each piece, keeping it from rolling onto the floor.
- Lay out the tools, supplies and container with ashes on the towel.
- Lay the piece of paper on top of the towel. Take a small portion of the cremains and place them on the paper. If you are concerned about any odors caused by the cremains, it is useful to know that it is uncommon for individuals to notice any scent from cremated ashes at all. Use the spoon to separate large bits (if any) of ashes from fine ashes. (You can also use the small sieve to separate larger bits from the fine ashes). The paper will also collect stray ashes while you're filling the urn.
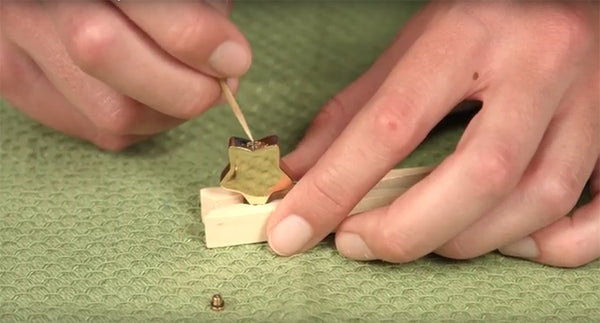
- Locate the screw cap on the jewelry and open the ash chamber using a small screwdriver (usually a flathead). Be careful not to scratch the jewelry.
- With the plastic spoon, scoop a small amount of the fine ashes from the paper.
- Place the small funnel into the compartment opening. If the cremation jewelry doesn't lie flat, use a clothespin to hold the jewelry upright with the opening at the top. (Or, consider having a family member or friend help you.) Avoid resting the cremation jewelry against something as a solution, as the motion of inserting ashes can cause it to shift.
- Pour a small amount of ashes from the spoon into the funnel. Gently shake the ashes through the funnel. If needed, use the toothpick to gently push ashes through the funnel. Be sure not to fill the chamber to the top. There needs to be room to easily put the screw back without disturbing the ashes.
- Use the toothpick to clear away any cremains from the threads. The cap should easily screw back in without obstruction.
- At this point, you'll close the urn with the screw. If you wish to permanently seal the urn, use the liquid adhesive - waiting until the end to apply (otherwise, the liquid adhesive may drip into the cremation ashes). Close the screw only about 80%. Then spread a dot of the adhesive under the screw head using the toothpick - close immediately to 100% before the glue dries. Allow 24 hours for the glue to dry.
Note: if your jewelry has a twist-off top, be sure the cap is in a position to lie flush when worn and in alignment with the flat side of the jewelry. (see video)
- To finish, wipe your urn necklaceor cremation bracelet with a fine cotton cloth to remove stray ashes or fingerprints. It's recommended not to submerge the jewelry in water.

After following these steps, your pendant or necklace for ashes should be filled and sealed and ready to wear out. These steps might vary slightly depending on which cremation jewelry you choose, but the process should be similar for most pieces.
While the thought of transferring cremated remains can be intimidating, it can also help to provide closure. If you are uncomfortable performing this task alone, ask a close friend or family member to help. Creating a personal ritual around the transfer could be helpful in the grieving process. It can be helpful to light candles, listen to music or find other sources of comfort while transferring the ashes, as these actions can help the transfer feel more symbolic.
Whether you're figuring out how to insert cremation ashes into jewelry or are still deciding if cremation jewelry is right for you, we hope this guide has helped provide the necessary information. For more information, consider reading some of our other helpful guides about cremation jewelry.
Polly is a freelance writer and editor. She has taught poetry and writing at local universities, has mentored students of all ages, and developed and co-facilitated workshops on creativity, poetry, and creative writing. She enjoys dabbling in drawing and learning watercolors. Her poems and interviews have appeared in various print journals and magazines, including Poets & Writers, The Café Review, The Wisconsin Review, and the Aurorean.